See ya Later

One of our dear friends is leaving Australia today with her husband and returning to her home in the UK.  Sadly their work here is finished and off to the other side of the world they return.  While I love all my friends, this one .... I shall call her Lesley (wink), came into our group so easily and so quickly.  It's hard to remember exactly when as it feels like forever.

So to farewell 'Lesley' in style, we took her to the Hyatt and shared a High Tea with her.  As well as lavishing 'Australian' themed gifts and trinkets on her, I made here a little tag book that I decorated and had all the girls, decorate a tag and insert into the pockets. 


I started with a pre-made Tag book that I had bought a while ago.  Can't even remember where no.  I covered it with Old Olive CS and stamped in Early Espresso & Baked Brown sugar ink and glitzed with Dazzling Diamonds and rhinestones.  I've used Crumb Cake seam binding for the bow and Very Vanilla CS for the sentiment and little butterflies.


I've used yellow as the feature on this page. Yellow is such a bright fun colour, so why not!  I've used my Stampin' Sponges to stamp Daffodil delight dots on the pocket page and decorated the facing page with retired DSP, a ribbon & twine bow and a label.  More bling of course ;)


I've used retired DSP (I think from the Fifth Avenue series?) and coordinated with Kiwi Kiss CS punched border and butterflies.  I've also die cut a Chloe stem in Whisper White for the main page.  More bling on the butterflies!!


This page uses retired DSP from last year's Sale-a-Bration, a pot of hydrangeas stamped onto Baja Breeze CS and hand cut, with the centres coloured in with Silver Dazzling Diamonds.  I've also diecut a doily and stamped over for the pocket page.


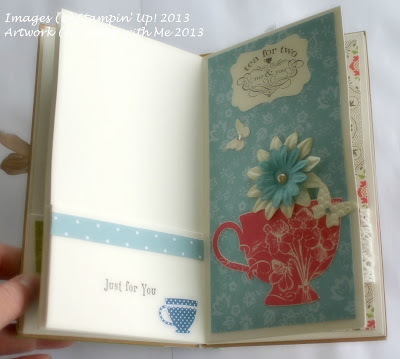
This page features the now retired Tea for Two stamp.  Seeing as we're both tea drinkers!!  I've stamped the larger cup onto Very Vanilla CS with Melon Mambo ink and adhered it so that the top rim was open (using dimensionals), which allowed me to put the flowers in.  I also added a few little butterflies too!


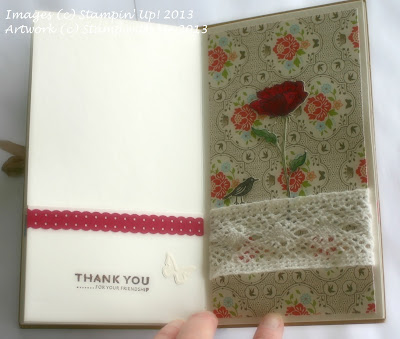
I've used more gorgeous retired DSP and a piece of vintage lace as a feature.  I've stamped the blossom in black and then coloured in with Copic markers for the vivid colour.  I've added a little birdie too!


This was such a sweet page to add.  It features one of my favourite stamp sets (The Nicest Things) and a beautiful sentiment for friends: "A friend is one of the nicest things you can have and one of the best things you can be".

Lots of colouring with Copics again and yes, if you're wondering - I've deliberately softened the photos which is why the text isn't so clear in this one.


And the back cover, featuring a little punched owl.  The Owl means a lot to our group of friends, seeing as 'Lesley' is part of our Hooterbelle's group!


The front of my tag.  I've used the Papillion Potpourri stamp set, lots of ribbon and special wool to tie the tag. 

All of the stamp sets I've used in this project (except Papillion Potpourri) are retired but are some of my favourite sets and great for making projects with meaning!  So 'Lesley' as a wise woman said to me, this is not goodbye, this is See ya later!  xx

Christmas in July

Well, if you're Australian like me, where the coldest time of the year - is right now!!  You start thinking Christmas in July!  It's the closest we can get to a winter white Christmas.  So when we made a Christmas card back at our last team meeting, I saved it until now.  It's perfect for a wintery-Christmas!


This card uses the new 'Tag It' set.  A special stamp set where Stampin' Up! donates to Royal McDonald House (a more than worthy cause) on the sale of each set.


We have stamped Santa in paper tole style, where each layer was stamped and cut (stamped Santa 4 times in total), and each piece was adhered separately and popped up with a little dimensional.

Don't you just love  the Silver Glimmer paper in the background?  It's so stunning and I love how it hard leaves a trace of glitter anywhere, even on your workspace!  Very important if you're a 'messy' crafter like me!!


We've embossed the Marina Mist CS layer with the Northern Flurry embossing folder and sponged lightly over with Whisper White Craft Ink.  It's a gorgeous card and one I would like to try in other colour combinations.  Plum with silver??  Red??

Anyway, if you want to make this card you'll need the following supplies:

Stamps: Tag It
Inks: Marina Mist classic ink and Whisper White craft ink
Papers: Whisper White & Marina Mist CS, Silver Glimmer Paper
Other: Big Shot, Northern Flurry embossing folder, paper snips, dimensionals and sponges

This card was inspired by one we saw at Convention this year and we made as a team project.  It's one of those things I love about being part of a team!


Stamping Toolbox

I often am asked, by new and experienced crafters alike, what are the essential tools for a Stamper, Scrapper, or Papercrafter.  So I thought I would put together a few of my must haves and a few of my favourites!  Today I thought I would share a few of the basics!

1.  Scissors
All crafters need a few pairs of scissors.  Designate one pair of scissors for paper and another for fabric and ribbon. Don't use your paper scissors, which will eventually become dull, to cut fabric; they can create pulls. 

I love my paper snips and have one for ribbon only.  Clean scissor blades regularly with eucalyptus oil, it will remove all the old adhesive on your scissors!


Paper Snips                                                                    Craft & Paper Scissors

 2.  Bone Folders
Bone Folder

More Papaya Collage

Well (it's a bit embarrasing to admit) but way back in April, we had a Papaya Collage workshop.  And during that workshop I was busy with all my guests that I never got a chance to sit down and make the cards from my own kit.  How terrible is that!  But over the recent school holidays, guess what!  I found some time to finish these cards (I had already made some) and now I can share them with you :)


Some of the cards are slightly different from the cards demonstrated at the workshop but it gave me the opportunity to personalise the cards for whatever the occasion was!


I love the beauty of these roses, the detail is amazing and I think that if you stamped them in black Staz On ink, you could have a lot of fun colouring and blending for amazing effects!

This card made a beautiful birthday card.  I just love the colours and although I didn't strictly follow the stamping instructions, it's beautiful anyway.  I really love this stamp set!

The colour is a bit washed out on this photo, but you can see the classic elegance of the card design.  Just lovely!


And last, but not least..... this beautiful card featuring the bird image:


Well, I certainly hope you liked these cards.  There is another card to this set which I didn't have any photos of, but it's quite spectacular and beautiful!  It's not too late to join in on this one, as I have a few kits to spare.  Let me know if you would like a kit!
Bring out the digital designer in you and discover MDS™!

I am not able to attend these events, but just in case you're located in Melbourne or Sydney, or even the other venues, why not take advantage of My Digital Studio training, from Stampin' Up!?


MDS™ intuitive digital design software features Stampin’ Up!’s exclusive artwork, colours and templates. Be your own digital designer and create an array of photobooks, cards, calendars, slideshows and more. Register for the Make a Statement Digital Tour, Stampin’ Up!’s MDS training events and receive MDS free! 


At the events learn how My Digital Studio can fit in with your life and your style to help you become your own digital designer—creating cards, invitations, photobooks, party décor, recipe books, home décor, calendars and more! Being creative couldn’t be easier! For only $35 AUD/ $45 NZD, discover a range of inspirational projects, ideas and techniques through project displays and engaging presentations. Just bring your laptop and digital images and follow along in our classes to create your own designer photobook—capturing your own cherished memories! You’ll go home with several complete pages—which you can then print, e-mail or upload to the Internet. Classes are designed for beginners, to provide you with a basic understanding of MDS software.


Make a Statement Digital Tour 2013 dates:
Melbourne 3 August
Sydney 10 August
Brisbane 17 August
Perth 24 August
Auckland 7 September

For more information about the events or to register click here


Click here for the Youtube video clip on all the amazing things you can do with MDS!!

Tic Tacs

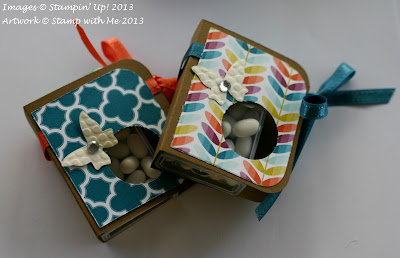
Ages and I mean ages ago, I made these cute little Tic Tac holders.  You know Tic Tacs, my kids love them, especially all the new flavours there seems to be.  So when we had our last Stamp Camp, I decided to make these as a little gift for all my attendees.


I had lots of Soft Suede cardstock left over from cutting all the kits, so while they didn't perfectly fit the tic tac containers, they did a really cute job of making them pretty!


I also used up lots of products from Sale-a-Bration including the Madison Avenue DSP and matching ribbons.


To keep with this colour theme, I bought white (peppermint) and orange tic tacs.  Yum!!  My theory was orange flavour for the younger set and peppermint for the adults.  Didn't always work that way, as some of the kids had their own ideas about what flavours they liked!!

I also added little butterflies cut with my Beautiful Wings Sizzlit and the Big Shot.  A little gem for the middle of course!


I couldn't choose my favourite colour combinations though.  I quite liked them all!  Although I do love the rainbow look of those leaves!

 
 So I made a few of those!!

And a few more!!  These were really simple to make and a great way to make things look so much better!!  I found the instructions through Pinterest and you can click on this link to take you to the Impressions by Rochelle blog for all the details!

Carolyn xx


Eat Cake

So the other week I had my catalogue launch for the bran-spanking new Stampin' Up! catalogue.  Well we've had school holidays since then, which means I've not had much of a chance to show off some of our projects made for the launch.  Both my friend (and demonstrator) Emma made a few projects highlighting the new Mosaic Madness bundle as well as a few other things.

And of course, with a launch, I always offer nibbles and a glass of bubbly or two.  And coffee of course!  So I had lot of fun with my washi tape when preparing for the launch!

I made tiny little tags with Washi tape.  They are so cute and so easy to make.  All you need is a tooth pick and washi tape!  Wrap the washi tape around the toothpick and cut into shape.  Any sort of shape.  I made mine into flags!


These flags use the Washi tape from the This and That range.  I love the Calypso Coral tape!


And of course, I pulled out the also very new stamp - Sketched Birthday - and made a little banner too.  Says it all really: Eat Cake!


And in case you're wondering, the recipe for this yummy cake (I doubled the recipe) was:

Vanilla fudge slice

Ingredients

60g butter
1 cup brown sugar
1 egg
3/4 cup plain flour
1/2 tsp baking powder
1/2 tsp salt
2 tsp Queen Organic Vanilla Bean Paste
80g butter
2/3 cup icing sugar
1 tsp Queen Organic Vanilla Bean Paste

Method

Step 1 Preheat oven to 160C fan-forced and grease and line a 15cm square baking tin so that the paper extends over the sides to form handles (to help remove the finished slice from the tin).
Step 2 In a small saucepan, melt the butter over medium heat then remove from the heat, transfer to a medium bowl and leave to cool for 10 minutes.
Step 3 Add the sugar, egg, flour baking powder, salt and vanilla and stir through until the mixture is smooth.
Step 4 Spread the batter into the prepared tin and bake for 20-25 minutes. Remove from tin to cool completely before icing.
Step 5 To make the icing, beat all the ingredients together in the bowl of an electric mixer until light and fluffy.
Step 6 Spread on top of the cooled slice.

Recipe located at: http://www.queen.com.au/kitchen/vanilla-fudge-slice

Single Markers


New Colour Markers


In the 2013-2014 annual catalogue, Stampin' Up! offers the Stampin' Write Marker New Color Kit (item 130034, page 163) to help you update your Many Marvelous Marker pack. Now, we've sweetened the deal. For a limited time, from 15 July until 31 October, you can buy any of the new colours in the pack or on their own! Go on, fill in the missing pieces in your collection or buy the whole lot.

With new colours to add to your collection, including Bermuda Bay, Crushed Curry and even Smoky Slate, you'll want them all!


ITEM  PRICE  DESCRIPTION
 130034 $49.95      Stampin' Write Marker New Color Kit
Bermuda Bay, Blushing Bride, Calypso Coral, Crushed Curry
Island Indigo, Pear Pizzazz, Pool Party, Smoky Slate, Soft Sky, Wisteria Wonder
 131899 $5.95 Bermuda Bay Stampin' Write Marker
 131265 $5.95 Blushing Bride Stampin' Write Marker
 131902 $5.95 Calypso Coral Stampin' Write Marker
 131901 $5.95 Crushed Curry Stampin' Write Marker
 131905 $5.95 Island Indigo Stampin' Write Marker
 131266 $5.95 Pear Pizzazz Stampin' Write Marker
 131904 $5.95 Pool Party Stampin' Write Marker
 131898 $5.95 Smoky Slate Stampin' Write Marker
 131900 $5.95 Soft Sky Stampin' Write Marker
 131903 $5.95 Wisteria Wonder Stampin' Write Marker
 
Contact me to place your order or go to my online shop by clicking on this link!

Please note, you can order these now and they will start shipping 22 July 2013!

Mosaic Madness Class


Join me for an afternoon of fun and creativity, where you will make three beautiful cards and a matching gift box. The class uses the Mosaic Madness Bundle (stamp set and coordinating punch)!


Date:         Sunday 4 August 2013

Time:         1pm to 4.30pm

Location:     UC Senior Secondary Collage, Lake Ginninnderra
                  Emu Bank, Belconnen, ACT 2617

Cost:
Option A:  $78* (Discounted class with clear mount stamp set bundle included) 
Option B: $85* (Discounted class with wood mount stamp set bundle included)
Option C: $30* (class only)

All supplies are included except for adhesives
*Price includes a light afternoon tea

Click here for your flyer and share with your friends!

To reserve your seat call or email me to arrange payment by 25 July 2013

CD Cases

So have I ever mentioned I'm part of a wonderful group of stampers called the Avid Inkers.  I'm sure I have, they're a fab bunch of girls.  Within the Avid Inkers, are the girls that have joined up to Stampin' Up! as a demo with me.  Yep, my team! If you want to find about joining, well just click here!

Well anyway, each month I send the girls a letter (amongst other things) and yes, I'm writing one now!!  So last month with the letter, I also sent the girls a CD that I have made with all the best photos and presentation slides I had of the recent Stampin' Up! convention held in Queensland.  But of course, I couldn't send them boring.  The CD itself was not printed and hand-written, so I had to make up with it, with the cover.  So guess what, I did!!


I used some of my favourite Sale-a-Bration papers (from both this year and 2012) that I had tucked away for a rainy day and cut them to size.  I made some little labels to match and decorated to my heart's content!


I cut some of the CD cases in two different sizes.  The narrower cut used Washi Tape as the feature to adhere the sides together.  I love WASHI!!


There are three different styles of Washi, in the This and That range.  And I love each of them!


For the larger cut CD covers, I used sticky strip as my adhesive.  Love that sticky strip, although you always have to make sure you line up things properly.  The sticky strip doesn't like being undone!!


I've used the Adorning Accents edgelits to cut the flap.  It makes for such a pretty edge.


And I've used the Bloomin' Marvellous stamp set, also another prized Sale-a-Bration possession to make little labels.  It truly is a gorgeous stamp set!

I've used the following Stampin' Up! products to make these:
Stamps: Bloomin' Marvellous
Papers: DSP from SAB 2012 & 2013, Whisper White CS
Inks: Pacific Point, Early Espresso & Pear Pizzazz
Accessories: Label & Itty Bitty Punch, Whisper White Bakers Twine, Washi Tape, Sticky Strip & Pearls
Big Shot: Adorning Accents Edgelits

If you would like the measurements for these CD covers, please contact me and I'll send them through.  If you would like further information on joining Stampin' Up! and being a member of Avid Inkers and my team, please click here or contact me for further information.

LinkWithin

Blog Widget by LinkWithin
Blogging tips