Lalaloopsy

OK, so yesterday's card was all about the boys and Star Wars.  So today's card is for the girls.  I have 3 nieces and one daughter to make girly cards for, so I'm always looking for new ideas.  Jessica is still loving Dora and Strawberry Shortcake now but my nieces are a little bit older.  So what does googling get me this time?  La La Loopsy dolls!!


I'm not sure yet if I like La La Loopsy dolls, I find their button eyes and shaped hair very odd but I guess if that is what girls like, well that's what girls like!!

This little dolly did have ringlets for her hair but these photos are taken after the card travelled with me to Melbourne, tucked safely into an envelope (also squashing the wing of the butterfly I can see).


This card also uses punches and a tiny bit of scissor work to make the card, but all in all, quite easy.  The ringlets (when she did have them) were made by wrapping the thin pieces of her hair around a pencil and holding their shape.


I've used lots of bright colours on this one, just to make it fun for my niece Isla who just turned five.  There was nowhere I could put the number 5 without overdoing the front of the card, so I kept that for inside the card!

I've used a few Stampin' Up! supplies for this card, listed as follows:

Stamps: Memorable Moments
Inks: Early Espresso inks, Regal Rose & Basic Black markers
Papers: Whisper White, Tangerine Tango, Island Indigo & Melon Mambo CS, scrap DSP
Punches: 1 3/4" Circle punch, Small Oval punch, Word Window punch, Decorative Label punch, Owl Builder punch (for hair bows!!)
Other: Big Shot, Dressed Up Framelits (for dress), Beautiful Wings Embosslit & Honeycomb Embossing Folder, Rhinestones, black brads & pink seam binding


My inspiration for the LaLaLoopsy doll card came from the Luvin Stampin' Up! website and you'll also find more examples and a video tutorial.  Love that!

Star Wars

Well, my kindy-kid son Matthew, seems to be on a roll at the moment with all the birthday parties he is being invited too.  When it comes to boys aged 5 to 6, well punch art is a bit of a winner.  Although DinoRoar is my favourite standby kit for boys.

So when Matthew was invited to a Star Wars themed birthday party, well I turned to a Google Images search for Star Wars punch art.  Incredibly there wasn't much to be found except for R2D2, the little robot from the original Star Wars!

So I grabbed some punches, some scissors and silver ink and set to work!


Sadly I threw out all my measurements (bugger bugger), I wanted to keep them handy in case I should need to make R2D2 again.  But I think you can get the general idea of the shapes used to create the card!


I've used the small circle punch to make the wheels, just by cutting off two sides.  In fact, the wheels were the same size as the two circles on R2D2's front before I trimmed them down.


I've also used up some scraps of Raspberry Ripple CS to make the stripes on the bottom of the card, and stamped the number five in Raspberry Ripple.  I've used the binder punch (long since retired) to add interest to the bottom of the Crumb Cake CS. 

So here's what I used:
Stamps: Memorable Moments & Perfectly Penned
Inks: Early Espresso & Raspberry Ripple inks, silver (metallic) ink
Papers: Pacific Point, Raspberry Ripple, Whisper White & Basic Black textured, & Crumb Cake CS
Other: Petite Curly Label, Binder & Circle Punches, Sponge Daubers and glue

To see the original of this card, be sure to check this card I pinned.

Sentimental Men!

Sentimental men, is there really such a thing?  Although I have to admit my WH is rather sentimental especially when it comes to his family and his car.  And yes, I do have that in the right order.  I asked him sometime ago how his priorities went and the car definitely came after family!!

So when the stamp set 'Feeling Sentimental' was released during Sale-a-Bration 2013, it was a great card to stock up on some male cards.  In fact, one of the cards came in handy the other weekend when I needed a 40th birthday card for a male.  All I did was add the 40, and presto, the card was done!!


These cards are masculine in every which way, just by using a male-oriented colour scheme.  I've used the Early Espresso C'oredinations card stock, combined with Crumb Cake, Very Vanilla and Night of Navy card stock.

 In this card, I've also used Chocolate Chip cardstock (plain) which contrasts beautifully with the C'oredinations cardstock which become distressed when embossed.  Believe it or not, you can embellish men's cards too.  With a brad here or there, some bakers twine.  Even sponging!


With this card, I've used the Chocolate Chip cardstock embossed and cut into a banner.  In fact, use a square punch to cut the triangular shaped piece from the end.  It's easy and NEAT!!


I've torn the edges of the stamped focal images to continue the distressed look and sponged with Early Espresso.  Very very lightly!!  I love Early Espresso, it's the new black.

And if you remember, this card was used to make the 40th card just by adding the number 4 0.


So to make these cards (the first three cards):
Stamps: Feeling Sentimental & Happiest Birthday Wishes
Inks: Early Espresso
Papers: Early Espresso C'Ordinations CS, Very Vanilla, Night of Navy & Chocolate Chip CS
Other: Big Shot & Honeycomb Embossing Folder, Polka Dot EF, silver brads, bakers twine & sponge dauber

So I do hope you like these male-themed cards.  These designs are adaptable to any stamp set you may have.  I was totally inspired by my friend Annette McMillan for these cards.  Annette is also a  member of Avid Inkers and creates beautiful cards!

Turning 40 too!

So yesterday I shared the card I made for a friend for her fortieth.  Now it's time to show the card I made for her husband who also turned 40 in the same week.  This time I took a male-themed card that I had prepared earlier and adapted it also for a 40th card.


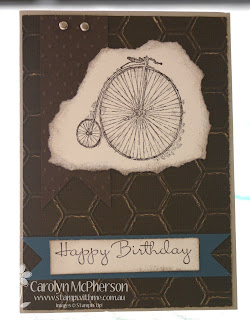
This card uses the Sale-a-Bration set 'Feeling Sentimental' for the great image of the Penny farthing bicycle (I think that's what it is called).  I've also used Early Espresso Core'd'nations paper which when embossed with the HoneyComb folder, revealed the 'core' paper inside adding to the distressed look!


I've stamped the bicycle onto Very Vanilla CS which I have torn to give the distressed look.  I've added a strip of Chocolate Chip embossed CS cut into a banner shape and a scrap of blue for the background of the sentiment.  A couple of brads and the card was done.

To make the card into a 40th card, I of course, just added 40.  This time die cut with Soft Suede CS.


So moral of the story.  When you need two cards for special birthdays like the Big 40, just take two cards and make them look 40!!

Turning 40!

Well, last weekend we were invited to a joint 40th birthday party and with life being extraordinarily hectic at the moment.  Hey, my mind has just wandered, ever tried to spell extraordinarily before.  Feels weird and very long!!

So anyway, I needed two cards, male and female, for my friend and her husband who were sharing a 40th party.  And of course, I didn't have any 40th cards handy.  So what to do!!

All good of course!  Adapt a card you already have!  So for my friend Alli, I used a beautiful Pool Party coloured card (see party theme happening here ....) and added a very glitter 40 to it!  Click here to see the original card and then see what you get here!!


Adding the glittery 40 made all the difference.  And I just love the colours too!


Tomorrow I'll be back to share the 40th card suitable for a male!  So here's what I used:

Stamps: Mixed Blossoms & Perfectly Penned
Inks: Early Espresso & Pool Party
Papers: Pool Party, Basic Black & Whisper White CS, silver glitter paper
Other: Blossom Punch, Circle Punch, Button (from Sale-a-Bration), crochet thread, eyelet border punch; Big Shot & Dots Embossing Folder.


Crochet Ripple Part 2

Hmmm, well my anticipated and much hoped for progress on my Crochet Ripple lap blanket didn't exactly go to plan.  Back in March, I shared my progress (which I was so proud of) that got stuck when I fell into the realisation of no more wool.  After much googling, eBaying and internet searching, I have decided to start again!


So this is where I'm at.  I've started again and after watching so many other ripple blankets come to life with the rainbow colours.  I've decided to try too!!

 
 This time I headed to the local Lincraft Store (10 minute drive, unlike the Spotlight drive which takes up to an hour).  And looked for a snuggly wool, that was 100% wool, and Australian!


And I think I've made a few lovely colour selections.  In fact, and as always my 'luck', the wool at Lincraft is on a huge sale, so I'm going to head back tomorrow and stock up on colours.  So I NEVER start a project to find I've not got enough wool!  And besides, it's going to keep me company on my trip to Melbourne!!


And in case you're wondering.  This lovely blanket featuring soft blue, pear green and a lovely brown colour is my stalled project.  Click on this link for the blog post to find out all about it!!  And this time I plan on finishing my rainbow Attic24 ripple crochet blanket. Maybe in time for Canberra winter!!


More beautiful butterflies

As promised, I wanted to share the second colour variation for the Swallowtail butterfly cards that I made yesterday.  The colour combinations that are striking work so wonderfuly for this design!


This time I've gone for the colour combo of Summer Starfruit with Midnight Muse.  It's so bright and cheery.  The perfect card for a cold-windy day here in Canberra!


As you can see, I've kept the design the same, with the collage curio butterfly stamped and featured as a medallion.  Love the ribbon to go with it.  I've also stamped the birthday sentiment in Midnight Muse to continue the colour theme.

I went back through all my pinterest pins over the last month or so and can't find where this card was inspired from.  I'll be back to share that once I do, as it's a beautiful design and not my original thought.  I've made this card as a swap card too, that's how much I loved it!!

Raspberry Butterflies

Hooray, I've finally found a moment to start shareing some of my projects again.  It's always a busy time for me when I'm working afternoon shift.  I spend the morning cleaning the house and spending time with the kids, go to work, come home and bed.  A repeating pattern for the whole week.  But today I'm determined to share something I've done.  It feels like ages ......

So I wanted to share a card I made this week.  It's based on a card I found on Pinterest some time ago but I decided to change up the colours.  So having lots of Soft Suede, Very Vanilla and Raspberry Ripple on my desk, being left overs from Sunday's class.  I thought what a perfect time!!


I love it.  The colours are so vibrant and the image of the butterfly is so clear!!


 I've used three different stamp sets here: Swallowtail, Oh Hello and Collage Curios.  They all add their own perspective to the card!

I have also finished off by using some natural cotton ribbon and Raspberry Ripple stitched satin ribbon too.  It just adds to the whole look.  Sadly not my design, but gorgeous nonetheless!!

So here's what I used:

Stamps: Swallowtail, Collage Curios & Oh Hello
Papers: Soft Suede, Very Vanilla & Raspberry Ripple CS
Inks: Raspberry Ripple, Early Espresso & Soft Suede
Other: 1" Circle & Petite Scallop Circle Punch, Ribbons, pearl and Dimensional's


Stay tuned for tomorrow's version .....


New Wood-Mount Cases!


Introducing our new wood-mount stamp set packaging! These new cases are similar to our clear-mount boxes and fit perfectly on the shelf right next to them. They also have the images and stamp set name on the spine to make your search for the right set even easier.


Starting 1 July all wood-mount sets will come in this new packaging (sneak peek sets will also be in the new boxes during the preorder). And empty cases will be available with the launch of the new catalogue. That means you can transfer all your old sets to these new boxes! There will even be a template for you to create your own label for your old stamp sets (available 1 July). A pack of four half-size cases (9.5 x 14 cm) will sell for $8.95 and a pack of four full-size cases (19.1 x 14 cm) will be $11.95.

Get ready for all the exciting new products in the catalogue--especially the new wood-mount boxes!

Watch this video for all the information!!


New Hostess Offer!


A very special Hostess Offer!

Ever wish you had more money to spend on Stampin’ Up! products? Consider it done. Between 15 April and 30 May just host a $400 or higher party and earn an additional $60 in FREE products! That’s on top of the hostess dollars and benefits you already get! 


Take a look at our already-awesome hostess benefits that you’ll get to ADD more hostess dollars to:


Contact me today to host your Workshop.  

Catalogue parties are WELCOME!!

And the fun doesn't stop there!!

Ever wish you had more money to spend on Stampin’ Up! products? Consider it done. Join Stampin’ Up! before 30 May and get an extra $60 for your Starter Kit.

Papaya Collage Class

Well, it seemed it took forever for this class to arrive.  I think maybe as we decided back in February that we were going to hold the class and well, finally we did!!

It was a gorgeous collection of cards, and the colours were just beautiful.  All the cards made on the day were pieces of art!!  I don't have any individual photos of the cards to share but this one kind of gives a hint!!


And I've also got a few happy snaps of the girls and one boy!! at work.  These pics were certainly not staged and I don't even think anyone knew I was taking them today!!


It's never too late to do this class.  Please contact me if you too would like to join in.  You can get all the supplies (stamps, cardstock, inks and more) at my online shop too!

Mums Love - MDS

Don't leave Mum 'til the last minute-it's time to get ready for Mother's Day. Whether you want to make her laugh, smile or move you to the top of the favourites list, My Digital Studio has what you need.


Check out our latest downloads (PDF) for card templates and a clever coupon book. Then, customize a project for your mum. She'll love it. We guarantee it. 

Elegance

Sympathy cards are sometimes the hardest things to do.  I never keep a stash of these cards handy, instead I prefer to make them as the need arises.  I look for cards with simplicity and elegance.

This card today is one I made a few weeks ago for a dear Stampin' friend.  I've used a design I saw in the world of Pinterest somewhere and used my own stamps and sentiment to suit the occasion.


I've used the Because I Care stamp set (now retired) as I love the hydrangea flower.  I've stamped the flower in Night of Navy to match the cardstock and tied off with some Island Indigo ribbon.  The embossing and pearls add to the elegance of the card.

Catching Up!

Gosh there has been so much news to share lately, that I haven't even had a chance to share some of my own projects with you.  And some of these projects go back a little bit now.  Thankfully in the chaos of my computer breakdown, we were able to salvage our data particularly my photos.  So now I can show them to you!


I'm so glad that Pool Party is part of the new Colour Refresh!  It's such a cute colour.  Well I think it is!


I've combined Pool Party with Whisper White and Basic Black and I think it gives a real kick!

I also pulled out a few favourites with this card, using the Mixed Blossoms stamp set which has great floral images and makes making cards fun and easy.  Because it has a MATCHING punch!!!  The gorgeous flower on the front is cut with a punch, not by me (although you could always use scissors {wink})!!


I have finished the card with a bit of button bling and embossed contrast.  It is a lovely card and a great one to use at Demonstrations.  Which of course is what I did last month down in Melbourne!

So here's what I used:

Stamps: Mixed Blossoms & Perfectly Penned
Inks: Early Espresso & Pool Party
Papers: Pool Party, Basic Black & Whisper White CS
Other: Blossom Punch, Circle Punch, Button (from Sale-a-Bration), crochet thread, eyelet border punch
Big Shot & Dots Embossing Folder.

I bet you could make this one too!!

Colour Refresh

Well the news from Stampin' Up! keeps coming in.  They're working hard to keep everything current and on-trend.  So its with pleasure (and a tiny bit of sad) that I announce the new Colour Refresh!

Check out these colours displayed in their new collections!


Why the change I hear you ask????

 
Beginning on 4 April 2013, all retiring/discontinued colour products (i.e. ink, paper, ribbon, accessories, etc.) will be available only while supplies last.
WHAT THE REFRESH LOOKS LIKE.
Q: What are the new core colours, and what are the In Colors that are returning as core colours?

A: The three new colours are called Bermuda Bay, Crushed Curry, and Smoky Slate. The seven returning In Colors as core colours are Blushing Bride, Calypso Coral, Island Indigo, Pear Pizzazz, Pool Party, Soft Sky, and Wisteria Wonder.

Looking for some colour inspiration with the new COLOUR REFRESH, why not try a colour challenge.  Use the colours of Basic Grey, Pool Party, Calypso Coral and Lucky Limeade. 


Head over to the Stampin' Up! Blog for all the colour challenge details.

Petite Curly Label Punch Now Available

Great news!  The Petite Curly Label Punch listed in the Sale-a-Bration brochure is now available for purchase!

Email me to place your order, or click here to Shop Now (as an online order).

Another Easter Basket

Okay, Easter is over for 2013 (although some places still celebrate Easter Tuesday)!!  But I just wanted to share one more Easter project that I made.  These adorable Easter Baskets.  I made a few of these for the girls at work, filled them with chocolates and Easter eggs.  And then listened for the Wows!! 


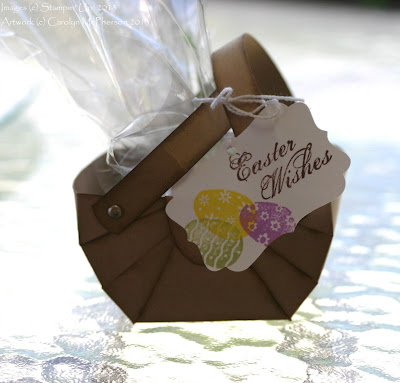
This little basket is based on a picnic basket.  It amazingly uses less than one piece of A4 cardstock and can be made in different sizes, colours and papers!  I've used Crumb Cake to make it look more like a basket!


I held my baskets together with a staple here and there, sticky strip and brads for the handles.  There are quite a few directions on the internet to make these, here's one for reference: Trio of Baskets.

They even look cute from the back!


I've added a little stamped tag, cut with the label punch and tied off with Bakers Twine.  I've used retired Easter stamps that I just couldn't part with!!  Stay tuned over the next few days to more ideas with the Basket!!

Bunny Baskets

Well, it's the day after Easter (I love Easter Mondays by the way) and I'm still surrounded by a whole load of chocolate eggs.  Amazingly my kids didn't eat many chocolate eggs at all today.  Maybe too much yesterday??

So as promised, I wanted to share one of my adorable Easter projects with you.  I can't claim the original idea, but the bunny is so adorable I just had to make one!


 Don't you just want to go Aaaawwwww.  It's so cute!!

I copied the inspiring instructions almost completely but adapted with what I had!!  I used Sahara Sand CS for the bunny, stamped with VersaMark ink using the now retired Sprinkles stamp set.  I used the More Amore Speciality DSP for the ears and a scrap of Raspberry Ripple for the nose.


My bunny is sitting on the front of a box, that I've cut with my fab Big Shot and used a strip of DSP for interest.  I also stamped a little egg and cut out with my small oval punch.  So cute.

For the full instructions and inspiring pic's head on over to the SU website.  So so cute!!


Sent with Love Special Offer

The new and exclusive Sent with Love Special Offer is here!  Use this Sent with Love product suite to make an array of travel-themed projects.


You can purchase the items individually or buy the Sent with Love bundle for just $46.95!  That's a bundled saving of 20% discount!

You can buy these items in 3 ways from me:
  1. Choose if you would like the items separately or as a bundle!
  2. Clicking on this link  to go to my online store and purchase online with credit card. 
  3. Contact me by phone or email and I'll order for you.  You can pay by credit card or direct deposit.  And I don't charge postage :)
Here's what's available to purchase:

Sent with Love Designer Series Paper (item: 132182), individually priced at $18.95


Sent with Love Stamp Set (clear mount only) (item: 131847), individually priced at $33.95


Purchase the Pretty Bundle for the special price of $46.25.  (item 132851)

It's a saving of 20% and you'll receive the following: The Sent with Love Stamp Set, Sent with Love Designer Series Paper, and Calypso Coral Baker's Twine .


The Sent with Love Stamp Set and Sent with Love Designer Series Paper are only available during this special offer. After 15 June, they'll both fly away!


LinkWithin

Blog Widget by LinkWithin
Blogging tips