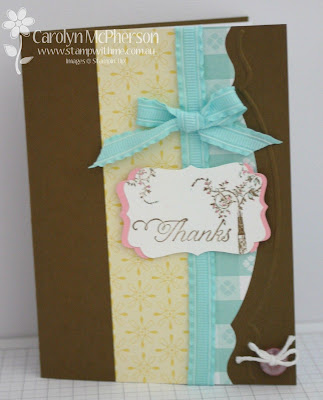
Technique Time - Delft Tile

Do you like happy mail?  I do, and I certainly love giving happy mail ..... so much better than bills!  So it was with much pleasure I put in the mail today and yesterday, little packages for some of the Avid Inkers girls (well, the ones who've signed up with me and I call my friends )!

 So each month or two I'll be sending the girls a technique card and a sample card using that technique!  And as it was the first month of the techniques, I also sent the girls the SU On Board Journal - the perfect companion for putting technique cards in.


But of course I had to send a little card to match the the technique and I chose the Delft Tile technique, of course I had to choose that one, I have a very Dutch heritage!!


For something different, I tried using a different colour for these little cards.  On my sample cards, I stayed with the traditional blues of Delft.  This time I used Concord Crush.  Very cute!

You can join in on the techniques too - either by joining in with my team or following some of the tutorials over at Splitcoast Stampers.  Like this one - the Delft Tile Technique!

Christmas Stamp-a-Stack

Join us for a Christmas Stamp-a-Stack at Nellie Hall in Melba, where for a couple of hours of fun and creativity, you will make 10 Christmas cards of assorted designs. Handmade Christmas cards are treasured by all those who receive them! 

All supplies are included except for adhesives.


Date: Sunday 14 October 2012

Time: 1pm to 4pm

Location: Nellie Melba Hall, Chinner Crescent, Melba 

Cost: $25 per person (BYO adhesives, including SNAIL, Dimensionsal's)*

OR

$30 per person (adhesives included)*


*Price includes a light afternoon tea, optional $5 fee extra to use adhesives or BYO adhesives


To reserve your seat call or email me to arrange payment by 5 October 2012

Click here for the Christmas Stamp-a-stack flyer

The NEW Ink pads!

Have you tried the new ink pads yet?  I love them and wish I could change ALL my ink pads over to the new one (but I really can't justify doing that!!).  I do use the ones I have all the time now!

So it's probably a good time to share some of the tips and important info for the new INK pads, and yes they are Juicy.  Very Juicy!!


Introducing. firm foam pads! They change your stamping experience for the better.  We know you're going to love these new Stampin' Pads, as they
  • Provide better ink coverage for your stamps!
  • Light-tap stamping produces flawless images!
In addition, our new Stampin' Pads
  • Create wonderfully solid images. The Firm Foam releases more ink onto your rubber stamp than the felt pads. When using the Firm Foam pad, your stamp will get an even, solid covering of ink that you may not have been able to achieve with the felt pads. Please note: if you are using the ink pad frequently you may need to re-ink your Firm Foam pad more often. We recommend that you purchase a refill at the time of your ink pad purchase. 
  • Have a crisply printed, glossy label on the top of the pad that is easier to read and that will not fade or chip off!
  • Come with colour name labels in all four languages (English, Spanish, French and German)--just choose your language, peel it off the back and add it to the side of the pad for easy identification!
  • Use the same patented flip-top case design that stores the inking surface upside down, so the pad surface stays moist!
  • Are available in all colours, including our exclusive In Colors!

Please note: Five ink colours have undergone formula changes to improve functionality and colour stability with the new firm foam pads. These colours are
  • Basic Black
  • Basic Gray
  • Marina Mist
  • Perfect Plum
  • Tempting Turquoise
All five colours of the reformulated inks have been fully tested and approved. While using the new ink formula in the old Stampin' Pads is fine, we do not recommend using the old ink formula in the new firm foam pads in the five colours listed above.

We do not recommend using the Basic Black Classic Stampin' Pad on Whisper White or Very Vanilla Card Stock. Instead, we recommend you use the StazOn Ink Pad.

Happy 50th

It's not often I get to make cards with the big ones on it.  You know the ones, the 21st, the 40th, the 50th and so on.  So when I had to make a birthday card for a lovely friend who has just turned 50, well I knew it had to be special!!


So of course, you've guessed about my addiction to Pinterest and blogsurfing now, so when I found a Christmas card that featured the numbers 25, I just knew I could make it into a special birthday card!!
And a special card required some special papers, just like the Everyday Enchantment DSP papers from Sale-a-Bration earlier this year.  I'm so glad I stocked up, the papers are just gorgeous!!

 
I've used the new Daydream Medallions stamp set with Poppy Parade ink to match the papers.  I even found some of the SAB ribbon to tie off as well. 


The card also features some box-pleat folding of the DSP and lots of glittery shimmer with the 50 die cut from glimmer paper.  Love it!!

So here'w what I used:
Stamps: Daydream Medallions & Teeny Tiny Sentiments
Inks: Poppy Parade & Early Espresso
Papers: Very Vanilla CS & Everyday Enchantment DSP (SAB-retired)
Other: Very Vanilla grosgrain ribbon, SAB ribbon, Jewellery Tag punch, white bakers twine, glimmer paper & Big Shot.

To see the original of the card, head on over to CarolynBennieInk.  The Christmas card version is just lovely!

Betsy's Blossoms

Betsy's Blossoms.  It was one of the first stamp sets I was able to buy from the new Catalogue as part of a pre-order.  But mmm, didn't really strike me as one of my favourite stamp sets.  But funny that.  After some searching through Pinterest (I love that place), I found some LOVELY cards using Betsy's Blossoms. 


So when I hosted my Catalogue Launch last week, Betsy's Blossoms was the PERFECT stamp set to show off the new ink pads which are so much 'juicier'.  The large fireburst stamp soaked up the ink like a dream and stamped so beautifully! 


I based this card on a card I found in Pinterest and it showcased some of the new colours perfectly too!!  So trust me when I say, just when you think you don't like a stamp set - you'll be pleasantly surprised at how versatile, how pretty, how coordinated those stamp sets can be.  Especially if you like to Google, search Pinterest or follow blogs!!

So here's what I used:

Stamps: Betsy's Blossoms & Up, Up and Away
Inks: Soft Suede, Raspberry Ripple, Midnight Muse and Summer Starfruit
Papers: Very Vanilla, Raspberry Ripple & Soft Suede
Other: Square Punch (1"), Curly Label Punch, Very Vanilla Seam Binding, Stampin' Dimensionals and Sponge Daubers.

Diamond Fold Cards

Gosh it's almost two weeks ago since I made these cards.  Time is still flying by!!  Today was the last day of soccer for my two boys, so we had a great morning out in the spring sunshine and wind, requiring a slightly small nap this afternoon.  So it's now almost 10pm on a Saturday and I'm finally catching up on emails and the like!!

So anyway, at our last Avid Inkers meeting, I asked all the ladies to bring some supplies for a surprise project.  The supplies list given to them was:

  • Simply Scored Tool, or other scoring tool

  • One 4" x 12" strip of heavy weight patterned paper or cardstock

  • Ruler

  • Pencil

  • Additional cardstock, embelllishments and stamps to decorate your card
So are you thinking?  The project was Diamond Folded Cards - they are so cute!!

 
I've never made Diamond Folded cards before, so I decided to use some retired DSP to practice the scores and folds.  I used this gorgeous blue birdie papers which of course called out for the Owl punch to be used in all its glory!!


I haven't decided yet what or to whom to send this card too, so I haven't done any sentiments on the side panels.  I'm thinking a birthday card though :0)


Having got my folds sorted, I then made a second card using the Scentsational Seasons stamp set new from Stampin' Up!.  I used textured Whisper White cardstock which gave the wonderful textured look to the stamped Christmas tree.  I flipped the cardstock over when I stamped the star, so it's a much better inked image (ie no texture!!).


These cards were surprisingly easier then I thought, so I recommend this technique to you all!  For full instructions, step by step including photos, head on over to this tutorial from Splitcoast Stampers.  You'll be glad you did!

A challenge!!

Oops, time is flying by. It doesn't help that the weekends are getting busier, the days are getting longer (so you spend more time outside) and the two year old miss is not sleeping well, which means you're not either!! So I've written up a LONG list of things I really need to do, today, this week, this month..... and one of them includes sharing this creation!! Last month I issued a team monthly challenge. All the girls (including me) we're given two pieces of 6" x 6" Domestic Goddess DSP. It's such a pretty paper set that I'm sure they didn't mind!


The papers were so bright and sunny, and featured the colours of Pool Party and Daffodil Delight.  Perfect spring colours (now that Spring is here!).  I've combined my DSP with Soft Suede and Pink Pirouette.  I had to make a thank you card for some lovely ladies that hosted a very elegant supper. 

 
For interest, I've also added ribbon and buttons.  Very feminine!!  I've also used the Adorning Accents Die and coordinated Adorning Accents Textured Embossing Folders to add some interest to the card too.  Love my Big Shot!!

So here's what I used:

Stamps: Rue Des Fleurs
Inks: Soft Suede, Pool Party & Pink Pirouette
Papers: Soft Suede, Whisper White, Pink Pirouette CS and Domestic Goddness DSP
Other: Decorative Label punch, Pool Party ribbon, button & thread.

New Holiday Catalogue!

It's Catalogue day today here in the world of Stampin' Up! and this new Holiday Mini Catalogue has got to be one of the BEST ever.  It's full of seasonal products, perfect for this time of year!


Want to see yourself?  Well click here to see the Holiday Catalogue online!!  You can also download it as a PDF so you can read on your computer, ipad or tablet or phone at any time!!

You can also click on these links to download the following:


One of the first things I want to make from this new Holiday Catalogue is the beautiful ornament featured on the front cover.  It's absolutely stunning!!


If you're wondering how to make this ornament, please watch the following video created by Angie Kennedy Juda of Chic'n Scratch.  Angie is a US based Stampin' Up! demonstrator and has beautiful work on her website.


Please contact me if you would like to have your own Stampin' Up! Holiday Catalogue (for Australian Residents only).

The new annual SU Catalogue!

Introducing the new 2012-2013 edition of the SU Catalogue!  It's here - it's finally here!!


It's full, and I mean choc-full of new things.  New products, new stamps, new inks, new colours, new everything!!  Want to see yourself?  Well click here to see the Annual Catalogue online!!  Download it as a PDF so you can read on your computer, ipad or tablet or phone at any time!!

You can also click on these links to download the following:

Annual Catalogue (PDF File)

Please contact me if you would like to have your own Stampin' Up! Catalogue (for Australian Residents only).

LinkWithin

Blog Widget by LinkWithin
Blogging tips