My Petite Purse

There's a bit of excitement here in the world of Stampin' Up! and blog world.  Here in Australia, Sale-a-Bration AND the Summer Mini catalogue ends on Saturday 31 March 2012, but the flip side is the new Autumn-Winter Mini Catalogue starts on the 1st of April, and I can't wait to share some projects with you soon.

Today I wanted to share a project inspired of a new product that is coming to Stampin Up! in the USA and hopefully to Australia soon after!!  I'ts the Stampin' Up! exclusive Petite Purse Die.  For lovers of the Big Shot like me, a die to cut and score my favourite boxes are perfect!  So inspired by these purses, I dug around my archived files and found the purse template.  I think it's almost the same, not sure about the size though but perfect for holding a chocolate treat or two!!

'xcuse the shadows, it is a wet dreary day here in Canberra!
I've used Peach Parfait CS and my much coveted Sale-a-Bration papers to decorate my purse.


And I've used my also much loved Sale-a-Bration brads as features on both the front and sides of the box!


I used my new ribbon border punch and a couple of butterflies to decorate, filled with chocolate and used some velcro to hold my purse shut.  It's very cute I think, and I'm wondering now if I could make it out of felt if I had the die...... I'll be 'patiently' waiting!!

Well Hello Kitty

I just love Hello Kitty.  Would have it on everything if I could.  In fact, if you google or search for Hello Kitty on Pinterest, well you can find anything.  So when I had to make a card for my cousin's daughter, what better chance then to make a Hello Kitty card!

I've googled, I've searched pins, and from a combination of cards, I came up with my Hello Kitty card!


She's so cute isn't she!!  Just a few different punches and the card was done in a relatively quick amount of time.  I had to add a birthday sentiment, so I cased that from one of the cards I saw.  She's not the first Hello Kitty I've made, I did make one for my daughter Jessica on her first birthday (gosh that's almost a year ago now), so here's a recap of that one:


More info on making this card is over at this post: http://ustampwithme.blogspot.com.au/2011/06/hello-kitty-hello-jessica.html

Editor's Note: This is the link that inspired me in the first place: http://astampabove.typepad.com/my-blog/2012/03/hello-kitty.html

Birthday Pop Up!

Well, so what else have I been up to?  Well on the weekend it was Stamp Camp and boy was that fun.  I'll share pictures and projects another day after I download my pics.  But today I wanted to show you a project I made at the Avid Inkers team meet.  It was a lot of fun, and we had no idea what we were to make until the end!!


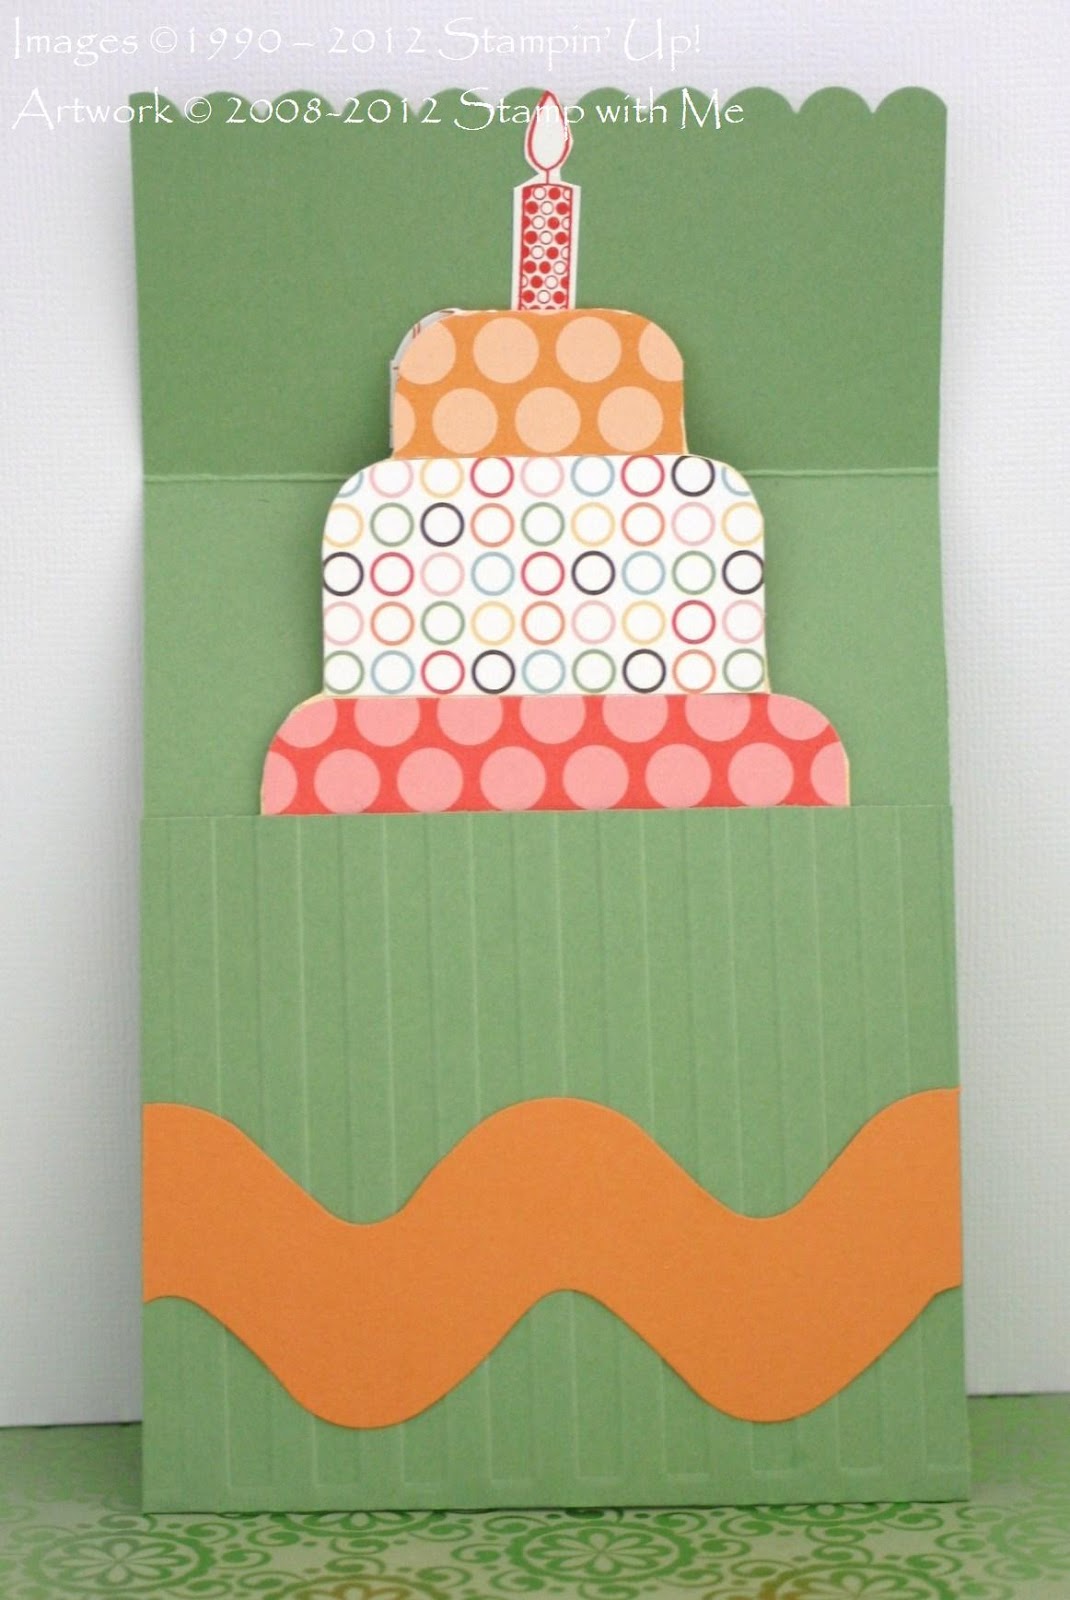
So ho hum right?  Another birthday card right?  Wrong!!  Guess what happens when you lift the flap?


A birthday card pops up!!  To make this card, is easier than you think.  Basically the instructions are:


Stamps: Create a Cupcake or Party this Way, Happiest Birthday Wishes

1.        Main Cardbase, cut at 11” x 4 ¼” and score at 3 ½” and 8 ¾”
2.       Run one end through the Big Shot using the Striped Embossing Folder
3.       Punch short edge using scallop edge punch
4.       Attach a ric-rac piece cut from the Big Shot with the Tasteful Trim die across front.
5.       Cut cake pieces from coordinating DSP as follows:
a.       Bottom – 2” x 3”
b.      Middle – 2 ¼ ” x 1 ¼”
c.       Top 1 ½” x 1 ½”, folded in half.
6.       Use corner rounder punch on top corners of all 3 cake layers, NB the top layer is folded when punched.
7.       Starting from top, adhere cake layers to a piece of CS measuring 4” x 3” noting that only one half of the top layer is attached with the fold to the top.
8.       Trim away excess CS away from the cake.
9.       Place sticky strip near upper edge of top cake layer and near fold on RIGHT side
10.   Sticky strip along both side edges of card pocket keeping adhesive close to edges.
11.   Holding cake upside down and back-to-front, adhere cake to card between 1/8” and ¼” above the score line.
12.   Fold cake down and tuck in to bottom pocket.
13.   Stamp Candle onto a scrap of Whisper White CS, cut out and trim if necessary and adhere above cake.
14.   Decorate front of card – Birthday sentiment is on White CS measuring 3 1/8” x 1 ¼” and layered onto coordinating CS measuring 3 ¼” x 1 3/8”.

Full instructions including video is located at:

A floral card

I'm rather embarrassed to note it's been over 10 days since I last posted on my blog :(  I'm so sorry, although I've had projects to share, I've just been so caught up in my commitment to the local kid's soccer club (I'm the player registrar) that everything else is falling behind.  But after this weekend, all the teams will be finalised and my work for another year will almost be done!!

So today I just wanted to share a projectthat we made at our Avid Inkers team meeting the other day.  We were told to bring the following supplies:


1.  A large symmetrical punch eg scalloped circle, heart, 5 petal flower etc
2.  A sheet of A4 cardstock
3.  A piece of coordinating cardstock cut 29.7 x 2.5cm
4.  Scoring/cutting Tool
5.  Embellishments - DSP, stamps, bling, ribbon.  I of course chose all products coordinating with the Sale-a-bration range (my fave!).

So are you curious?  Well this is what we made:

 We made this gorgeous folded card and used the punch to form a window.  My punches didn't quite work (and I wasn't willing to force them to cut through 2 layers of cardstock), so I had repair the half cuts it caused to the cardstock as best as I could.  This first picture shows the card fully folded inwards with the coordinating belly band on.

This second picture shows the card open and you can see the effect of having the punched window.  I decided to decorate the inside of the card so that it matched with the front.  I love using little special features.


This photo shows what happens when your 21 month old toddler gets hold of the card and pulls the rolled flowers apart.  I was able to repair one perfectly but the other one required quite a lot of glue (it's still wet in the photo - oops!) and I think she tore off one bit completely so it didn't quite cover the green :(  Oh well, live and learn.

Overall I really liked this card.  I'm not sure about forcing the punches to work their way through 2 layers, but maybe the Big Shot??

Just beautiful

I saw this most beautiful card ever through Pinterest.  Have you checked out Pinterest?  I use it as my visual pinboard or bookmarking service!!  Anyway I digress.

I saw this beautiful card from StamperCamper's Corner and just had to case it.  It's so beautiful that I just couldn't help myself.  The simplicity, the elegance and the beauty, OK I love it.  So without any further ado, here it is:


Do you see what I mean?  Just beautiful!!  This card is off to visit a new friend of mine (although it should now say belated birthday as it's late :( .... but nonetheless, it's now in the mail)!


I've used Vintage Vanilla which shows up beautifully in this second card.  Some embossing, some punching, some diecutting and one stamp - and the card is done!  Here's what I usedL

Stamps: Teeny Tiny Sentiments
Inks: Early Espresso, Old Olive & Concord Crush
Papers: Very Vanilla, Old Olive & Concord Crush
Other: Big Shot, Petals a Plenty Embossing Folder, Butfferflies Die, Modern Label, Word Window & Square punch, ribbon and Glue Dots

I hope you like my version and for more inspiration head on over to the StamperCamper's Corner, you'll be glad you did!


Even more reasons to join Stampin' Up! this month!

Sale-a-Bration is here! Earn exclusive Sale-a-Bration stamps, papers and embellishments during Sale-a-Bration!
Earn free products. And that's exactly what it means, lots of freebies to be had when:
* Choose a FREE Sale-a-Bration product for every $100* you spend.
* Host a Stampin' Up! workshop with me, and earn a grogeous FREE Sale-a-Bration for every $600* in workshop sales!
* Join Stampin' Up! as an Independent Demonstrator for just $249 and get a FREE stamp set of your choice!
Sale-a-Bration runs from 24 January to 31 March 2012. Lots of time to earn gorgeous and FREE products. 

To see the range of Sale-a-Bration products, click here to see the online catalogue. And don't forget to contact me to place an order or book a workshop!

* please note this does not include any postage & handling charges


 Newsflash Update: Join Stampin' Up! as a Demonstrator during March 2012, and on top of all the Sale-a-Bration offers, receive $50 off the Stampin' Up! Convention registration fee.  For more info, please contact me!

Elementary Elegance

So it's the last month of Sale-a-Bration and I'm still discovering new ways to use the gorgeous SAB products.  Over in the world of pinterest I saw the gorgeous card and just simply had to case it.  I didn't have all the products, but I got as close to it as I could!


I've distressed, sponged and curled the edges of the Happy Birthday background and popped up the Happy Birthday message with dimensionals.  It's definitely a scrappy card, maybe vintage, not my style but I love it.  Maybe it's the colours, who knows but I just had to make this card!

Stamps: Elementary Elegance
Papers: Whisper White, Basic Black, Soft Suede & Poppy Parade CS, Everyday Enchantment DSP
Inks: Soft Suede, Poppy Parade & Crumb Cake
Other: Big Shot, Vintage Wallpaper DSP, Decorative Label & Curly Label Punch, pearls, and sponge daubers

Spice Cake Flowers

As much as I love the Sale-a-Bration papers and stamps, I also adore the Spice Cake range in the Summer Mini range.  So when my friend Tania designed these gorgeous flowers, I just had to make one!!  And luckily for me, Tania had made me a little kit (as I missed out on our Stampin' Up! demonstrators meet up!).


Isn't it gorgeous!  My loops were flattened a little but you can see the fabric wrapped pencil which is the 'stem' of the flower.  Coordinating papers, fabrics and buttons.  Love Love Love!!


LinkWithin

Blog Widget by LinkWithin
Blogging tips