Creative Elements

Creative Elements!  Doesn't that sound great!!  It's just one of the new stamp sets from the 2011-2012 Idea Book & Catalogue.  And of course, I got myself one in the very first order I put in.  I treated myself to two new stamp sets actually, you'll have to wait for tomorrow to see the next one!!

Anyway, I did a Workshop for one of my friends last weekend, and of course, it was the perfect opportunity to open the stamp set and we all could have a play!


This was my first example and I love it.  We've used Champagne Shimmer paint to add some glamour to the butterfly and the new punch.  Can you guess which one it is???

 
This was a variation of the first card, with the flower as the focal image, and yes it's a little bit offside - it's supposed to be so you can see the pattern underneath!

Here's what I used:
Stamps: Creative Elements
Inks: Early Espresso
Papers: Early Espresso, Pink Pirouette, Whisper White & Crumb Cake
Punches: Large Circle, Large Scallop Circle and Lace Ribbon Border
Other: Brads (Metallics), Shimmer Paint - Champagne Mist, Sponge Daubers, Basic Jewels - Pearls

And did you guess it??? The Lace Ribbon Border Punch is one of the fantastic new punches now available.  It's got so many uses and in this card, I trimmed it in half for a completely different effect!

October Stamp Camp

No, I'm not even going to mention how many days until Christmas.  I'm not even going to mention, that I've already seen the 12 weeks to Christmas countdown begin. All I am going to say is ..... October Merry & Type Stamp Camp is coming. Just in time to get a head start on your Christmas card making!!  So here's the goss:


You are invited to the Merry & Type Christmas Stamp Camp. 

The vintage feel of this Christmas card set will bring back happy memories of past Christmases and would make a delightful gift.  You will be making four cards with all supplies included.  


 Special offer: Bonus instructions for two more cards and some beautiful tags using the Merry & Type stamp set is included with both Kits.

Date:      Saturday 22 October 2011 

Time:      12.30pm – 4pm 

Location: Chisholm Community Centre, 15-19 Halley Street, Chisholm   

Cost:     Kit A - $79 (including Merry &; Type Stamp Set – wood mount)* OR
              Kit B - $70 (including Merry & Type Stamp Set – clear mount)* OR
             
              Class - $30 (class only)*

             * price includes afternoon tea & door prizes.


So come on, join us for the fun afternoon of Christmas card making, with yummy afternoon tea and door prizes too.  There will be lots of other ideas on our display boards for inspiration too!

To reserve your seat please call or email me:

 Carolyn McPherson
Independent Stampin’ Up! Demonstrator
ph: 0417 165345
Email :
carolyn@stampwithme.com.au

Happy Birthday!

It's my WH's birthday day for you.  He doesn't pop up on my blog very often (he prefers to stay in the background), but he supports me and my crafting habit, is a wonderful husband and father to our three kids!

We are celebrating his birthday in Sydney, so it will be an exciting event for the kids.  They love visiting Sydney (although not the road trip part!!).  Of course, I had to make my WH a birthday card, and I was struggling for a male appropriate card.  So what to do, what to do!  I opened up the 2011-2012 Idea Book & Catalogue and was inspired by a card which had a little flag banner using the Circle Circus stamp set.  I made my own version and came up with this:


I've used Creamy Caramel as the cardbase, added Kiwi Kiss and Peach Parfait to give some bright colours without looking girlie.  If you're wondering about the sentiment, I forgot to bring one to my Craft night last night, so my lovely friend Petra who has wonderful handwriting for me, did it for me.  Perfect!!  I used scraps of Elegant Soiree & Subtles Collection DSP for my little flags.

I had a MASSIVE giggle though, when my 8 year old son said they looked like pants hanging on a washing line!!  Ah, kids.  Love them!

Here's what I used:
Stamps: Circle Circus
Inks: Kiwi Kiss
Papers: Creamy Caramel, Whisper White, Kiwi Kiss & Peach Parfait.  Scraps of DSP
Other: Crochet Thread

Happy Birthday Craig.  We hope you have a wonderful day.  Love from Me & our kids xx

Toot Toot!!

I have a very excited 3 almost 4 year old in our house.  He's been invited to his first party from his preschool friends.  So Matthew and I went shopping for a present for his (Thomas the Tank Engine) train crazy friend - Jackson.  Of course, I had the fun part of trying to have Matthew understand that the present is for Jackson and not for him!

Anyway, I was on google looking for a Thomas card that I could make for Jackson, but instead I found this really cute Accordian Fold Train Cary by Lynn Pratt over at Stamp-n-Design.  I followed her instructions to the letter, with a slight change in size of the cardstock width (a tad bit shorter).  I also let Matthew choose the stamps and colours of our train.  This is what we ended up with:

Excuse the poor quality of this photo..... This is the front cover of the card.  I've used my Big Shot to make the number four and you can see the whole card is tied together with Basic Black Satin Ribbon.  The inside of the card opens out to this:


As you can see, it's bright with lots of fun little train and animal images that were all cut out.  The trees and mushrooms were stamped directly onto the card.  Matthew stamped the little smoke puffs with Soft Sky ink.  He was so proud of this card, and said "You're Great Mum"!  So precious!

Here's what we used:
Stamps: Choo Choo (retired), Fox & Friends, Funky Four, Well Scripted (retired) & Right on Track wheel (retired)
Inks: Old Olive, Green Galore, Yoyo Yellow, Pacific Point, Poppy Parade, Soft Suede, Basic Black, Tangerine Tango and a few markers too.  Some colours are retired though :(
Papers: Marina Mist, Pear Pizzazz & Whisper White CS

I hope you enjoyed this little card.  If you would like to make your own ... head on over to Lynn's website.  You'll be glad you did!!

I got nothing!

Yep, I've got nothing.  I'm putting my hand up, honestly and admitting I've got nothing to show.  After a hectic week of goodness knows what, it's already Tuesday night and I'm supposed to be studying!  It's been hectic to say the least.  My weekend was great but tinged with a hint of sadness knowing that my mum would be leaving again (she left yesterday) to return to her home in Holland.  Bittersweet for sure.  But happily I can say, that my first order from the oh so pretty catalogue arrived today.  I haven't opened it yet, for fear I will be too distracted to accomplish my studying, but I know it's waiting as my reward!

And then I looked at my diary and realised, oh my gosh, it's already September 13, it's my husband's birthday in 5 days and I've got no present organised and no card made.  Guess what I'll be doing this week!  And then I looked up and saw my calendar page. At least they're done ....

My September calendar page was a Sunday Scraps project, using up bits and pieces after I used the Butterfly Prints stamp set to make a card.  I've used Kiwi Kiss cardstock and a scrap piece of DSP from my Subtles Collection.  Some bling and the butterfly punch, done.


And from the looks of it, August was definitely a Sunday scraps project with very little done to it.  I must have been in a frantic rush for a page, LOL.  Definitely not my greatest work, oh well.  This of course, uses the now retired Eastern Blossoms stamp set and Sunny Garden DSP also retired.  I will miss them.

So as my projects are definitely not inspiring, perhaps a little read of this online magazine TICKLE THE IMAGINATION! might give you a burst of creative inspiration.  It's on my to-read list, when my studying and bill paying is done!!


Birthday Flutterbys

I just wanted to show off the card and brooch I made for my friend Kerri (actually, I hope it's got to her by now as she'll be getting a sneak preview otherwise!!).  It's so cute that I couldn't wait!!  I've been making lots of flower brooches lately, and this is one I've just made in pink.  It is very cute and now I'll just have to make one for myself!!  But of course I had to make a card to go with it!!


Isn't it cute!  It uses up some lovely pieces of my Subtles Collection DSP and of course butterflies too!  I've used my little green buttons for both the ribbon centre and the butterflies!  But the brooch, of course, here's the brooch:

It's so pink and pretty and it has the most gorgeous rhinestone centre too!  Definitely going to have to make myself one now!

My brooches are my own design, but I will share the details for the card!!

Stamps: Butterfly Prints & Flight of the Butterfly
Papers: Whisper White & Crumb Cake CS and Subtles Collection DSP
Other: Butterfly punch, button, crochet thread, white satin ribbon & Mini Glue Dots

So ok, the brooch is my design, but I did case the lovely work of Chat Wszelaki!

ATCs - Birds

Did you catch your breath after yesterday's LONG post?  LOL!!  If you're a familiar reader, you'll know I'm short and sweet, I don't really talk about much other than the project I've made.  I guess, that's me, private by nature!  So before I start babbling, I thought I would show my latest ATC for the Stamp Happy Yahoo Group.  It was for the month of August, and the theme was Birds - owls, feathers, flight. I have just realised that I forgot to name it on my ATC label, but I've called this one .... Birds of a feather!  Original, hah!


I've used only a few techniques this time, but enough to create a collage of sorts!  I've thumped and bumped the background in Baja Breeze and Pear Pizzazz, and then used sponge daubers to colour my sun with Daffodil Delight.  I've used the Nature Walk stamp set and the Clearly for You stamp set for the birds, cage and the eggs.  I cut out the bird, coloured his chest with Riding Hood Red and gave him a black little pearl for an eye.  I hope you like, and more importantly, I hope my swap recipients like!!


So to recap what I've used:

Stamps: Nature Walk & Clearly for You
Papers: Whisper White & Soft Suede CS
Inks: Early Espresso, Soft Suede, Riding Hood Red, Pear Pizzazz, Baja Breeze & Daffodil Delight
Other: black pearls

Well, the kids are calling .... so as usual, just a quick post!!  Ciao xx

Happy Father's Day!

To my dad and my husband, and to all the father's out there .... wishing you all a wonderful Happy Father's Day!

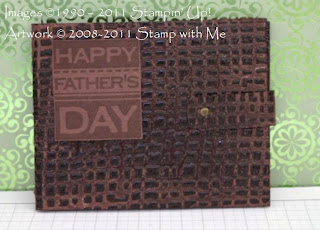
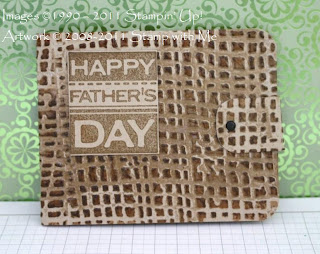
Inspired by some of the projects I've seen made by friends for their dads, well I thought I had better do something myself.  So I  made both my dad and my husband, a faux leather gift wallet.


I used two colour combinations, a Chocolate Chip base and a Crumb Cake base.  My boys chose that their dad received the Choc Chip wallet and their Opa (my dad) received the Crumb Cake wallet.


The Choc Chip wallet, uses Chocolate Chip CS, and Chocolate Chip, Early Espresso & Cranberry Crisp inks for colouring.


The Crumb Cake wallet, uses Crumb Cake CS, with Crumb Cake and Creamy Caramel inks.

Inside the wallets, it has been designed to hold money, gift vouchers or gift cards.  I made up little vouchers for my boys to fill in.  So they chose things like breakfast in bed, chocolates, books to be redeemed within the year!


I've decorated my wallets with the Father's Day stamp from the Occasional Greetings set (now retired) and used a scrap piece of faux leather CS to make the leather clip.  I've used a corner punch on all the corners too!  I've attached one side with a brad and on the back, I've used some scrap pieces of magnet so that the wallet can be opened and closed.

I've used the French Foliage stamp set with the colours of Soft Suede, Pear Pizzazz, Tangerine Tango, Wild Wasabi, Daffodil Delight and Kiwi Kiss to decorate the voucher cards and then stamped the Happy Father's Day sentiment (from Teeny Tiny Sentiments) in Chocolate Chip!

I've used an online tutorial to make the wallet and so that I know how to make it again, the dimensions I used were:

Outer Wallet: 9" x 3 1/2", scored at 4 7/16" and 4 9/16" (faux leather)
Inner Wallet: 8 1/2" x 3 1/4", scored at 4 1/4"
Card Slots: 2 pieces of 4 3/16" x 2" and 2 pieces of 4 3/16" x 1" (faux leather).

So that you can put money in the wallet (we didn't), only use glue or sticky strip along the bottom of the inner wallet piece.

For the card slots, use glue or sticky strip along the two sides and the bottom only, so that you can insert your cards.

Other tips from the tutorial, leave a small gap towards the centre of the card slots so that the wallet can fold without bunching. 

I've also followed an online tutorial for faux leather, so my quick steps for my own future reference:

1.  Dry emboss cardstock with the Big Shot and an Embossing Folder - I used the Jim Holtz burlap EF.
2.  Dab your ink pads all over the embossed CS until you have the colour effect you like.  Allow to thoroughly dry.
3.  Dab a VersaMark inkpad all over the embossed CS and sprinkle all over with clear embossing powder.
4.  Use a heat tool all over the CS until the embossing powder is melted.

To see the wallet that inspired me in the first place, head on over to the blog of Debbie P

Wow!  This was a long blog post for me.  I had better go and make sure my wonderful husband has a great day with us and then ring my dad (he lives in Melbourne) and wish him a Happy Father's Day too.  I love you both xx

Join SU during September for $169!

During September 2011, you can join the Stampin’ Up!® family as a demonstrator for only $169! The limited-time mini Starter Kit—valued at over $310—comes with the high-quality products listed below.


For just $169, you'll receive all this in your Mini Starter Kit:

• Easy Events Clear-Mount Set*
• Pennant Parade Wood-Mount Set*
• Basic Black Classic Stampin’ Pad®
• Old Olive Classic Stampin’ Pad
• Pumpkin Pie Classic Stampin’ Pad
• Real Red Classic Stampin’ Pad
• A4 Smooth Card Stock Assortment
• Just Add Cake Designer Series Paper*
• Chocolate Chip 1/2" Scallop Dots Ribbon*
• Notes Cards (20)
• Clear-Mount Block C
• Blender Pen (1)
• SNAIL Adhesive®
• Business supplies
(*New to the 2011-2012 Idea Book & Catalogue)

 Of course, you if you want the FULL STARTER KIT, it's 20% off during September 2011 only!

Click here for more information and contact me now and I can help you join the Stampin' Up! family too!

The New Stampin' Up! Idea Book & Catalogue is here!

The very shiny and pretty 2011-2012 Stampin' Up! Idea Book & Catalogue is here and available from today!

Stampin' Up!'s award-winning Idea Book & Catalogue is not only filled with beautiful stamp sets and accessories, but also hundreds of project ideas!


To download the Idea Book & Catalogue as a PDF or to find all the supplies you need to make any of the beautiful projects featured in the Idea Book & Catalogue - click here.

LinkWithin

Blog Widget by LinkWithin
Blogging tips